Enjoy your holidays and see you in the new year, I won't be posting much in the first few months of 2015 as i'm back to paid work next week but feel free to check out the blog and leave comments.
Roger
 This last week and today has been spent making a new companionway, again as its a jigsaw puzzle where the position of all the pieces are known to someone else certainly not me i realised a few weeks back the companionway is a pivotal piece of joinery which will determine where the galley starts and also where the battery compartments display panel will go hence i got the lid scribed and fitted then stopped to build the companionway.
  I wanted the door to stay attached as it being of such a wieldy size i dont like the idea of it sitting around loose while you work on the engine so a trip to the local builders merchants got me two polished 304 stainless butt hinges, the gas struts will have to wait until finances improve or i go out back out to work full time.
 Speaking of which having killed a couple of sheets of ply needlessly well not needlessly but trying out different ideas with the tanks i now have concluded its easier on my pocket to prototype in MDF and then nip, tweak and fettle till i'm happy with the overall theme then transfer everything to marine ply, also went wild and bought new blades for the table saw and circular saw as it was getting silly with the quality of the cuts i was producing. Got so bad thought of asking the neighbour but one if i could borrow a rifle to cut the boards with.
 Stopped midweek for a day after receiving an email the previous weekend asking for some help on a Westerly with the pox which i duely did, the guy should now be well on the way to getting his boat back to health.

 Haven't achieved a great deal this week, but got a bit further along and ticked a few more things off my mega list; these included building and mounting the lid for the battery box, making up plywood panels to section off the different lockers under the cockpit* and making the box that the galley module will sit on.
 Still thats done, just needs a couple of coats of white but seeing as its so cold in the shed and i don't want large heating bills i may wait to paint these bits, the big job i started on Thursday after finishing the battery box for now was the galley box.
 Didn't get it totally finished today but will have it bonded to the hull and wrapped to tomorrow. Again i've realised there's an order to the chaos in so far as i can't build out the galley until the companionway is built seeing as that will abutt the galley and the battery /electrical are on the other so will get that in then sort the floor out whilst trying to keep the ply waterproof.
 I've come to realise everythings about payoffs in this life; what you do or feel on the one hand may have implications on the other and so as the interest in finishing the boat returns my bank balance and means of replenishing it dwindle away.
  For having no background in my industry a customer told me this week that what i'd conservatively estimated as being a couple of days work could infact be done in four hours, "brilliant, how?" i asked looking them dead in the eye.
 Now I'll do my utmost to swing a job for the sake of a few quid but increasingly this is what i deal with time after time after time - where people treat me like ebay insofar as "we're prepared to go to this figure", but what about the hours, materials, knowledge etc? No apparently you now just pluck a figure out the sky and i'm supposed to bend over and take it. I've had this all year for reasons best known to everyone but me as my day rate is shrinking as i'm aging yet still no work?
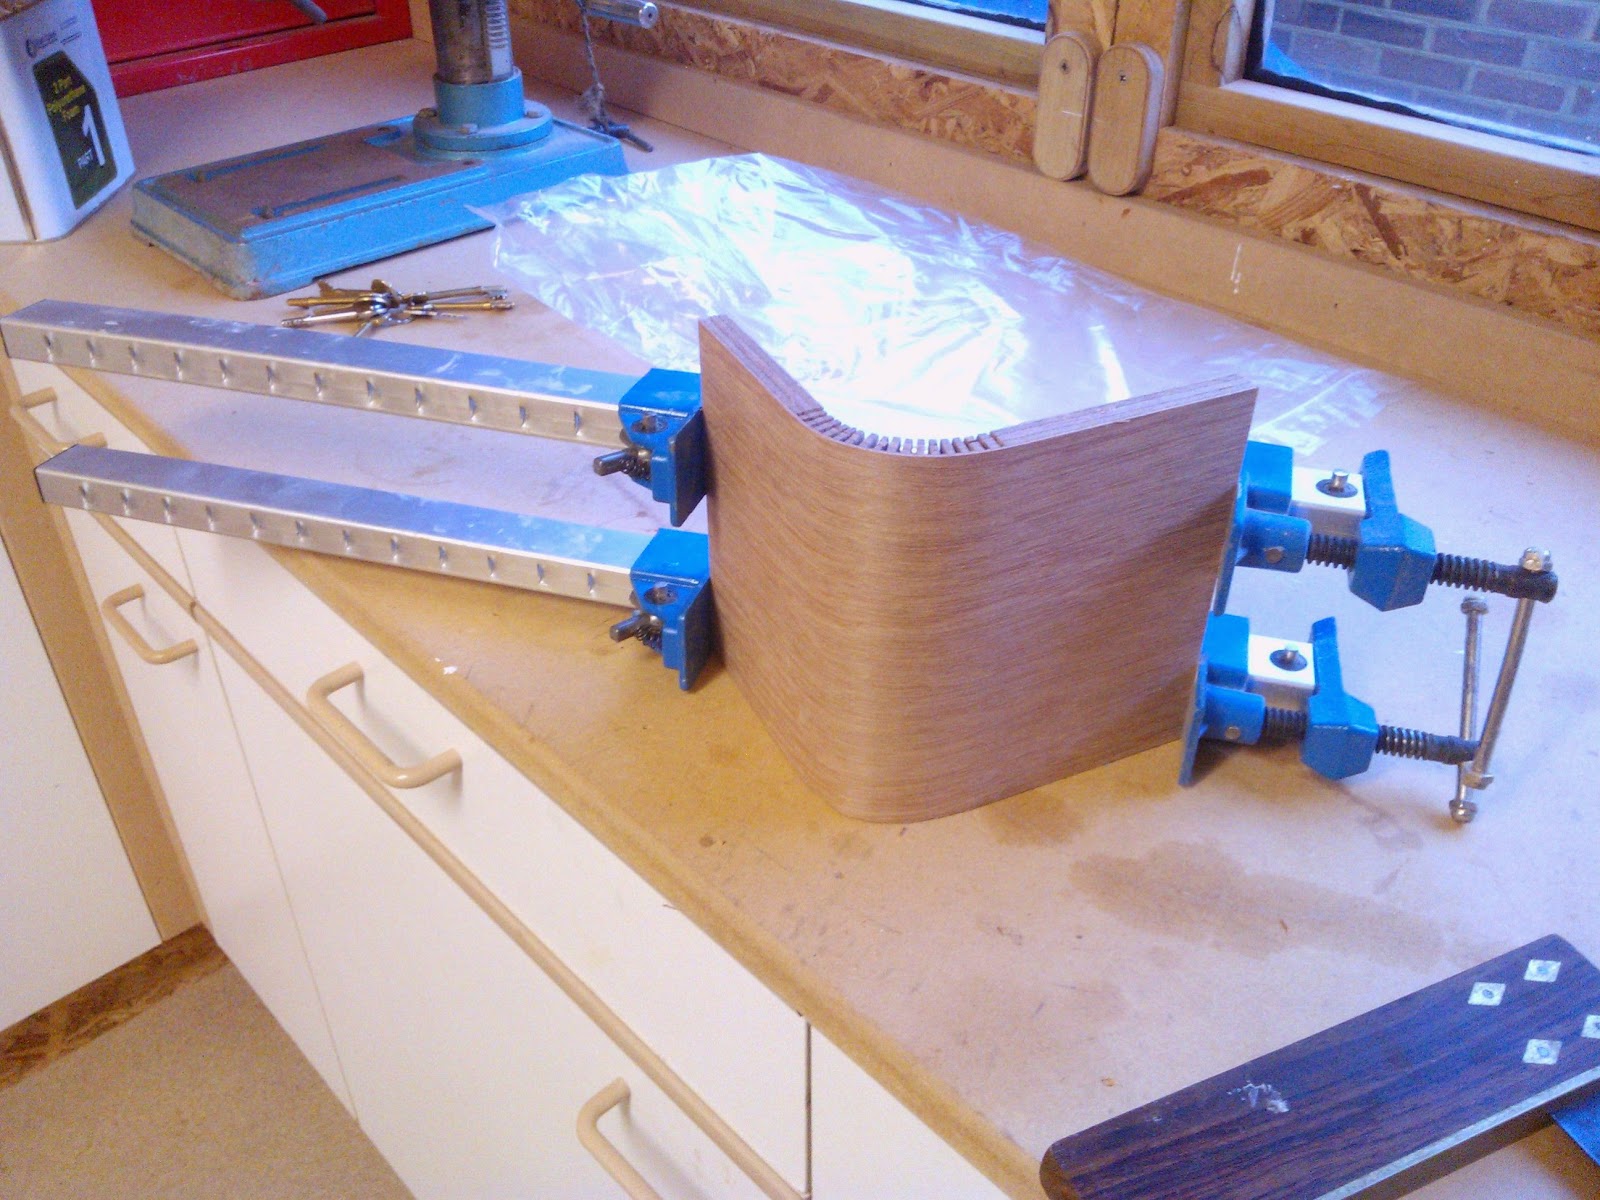 For me 2014 has been the year of the bullshitter where paid works concerned, i'm done dealing with shifty-arse builders, hormonal housewives, and idiot husbands who have not a bloody clue what they're talking about or what it takes to do my job yet seek to tell me how long it'll take and therefore what it will cost.
 There i was making and installing insulation panels Monday when the phone went, "Rog its Tony - you about tomorrow?" "yeah" i replied "okay John and I about if you want to fit this engine" at this point i knew i was a mile off but for some reason said "yeah sure come on over".
 Then cut the sheet of 25mm ply i had left over from doing the keels to fit across the cockpit as well as build a stud frame in front of the companionway hatch to support the roof and a lintel timber to take the block and tackle as well as brace the shed roof and on top of all of that finish insulating the compartment of which i had attached the second panel!
  Still when the guys showed up i was sort of there or thereabouts, i explained the plan to which everyone nodded then got on making the braces whilst Tony and John got the engine hauled up the back of the boat.
 Have to admit had a bit of a play with the couplings and bolted them altogether as well as sliding the prop shaft back and forth from outside just to make sure i wasn't dreaming, it really does all line up.
 My confidence is improving with the engine as i now know what every part does and where each cable goes and connects to, quite impressive for a dolt like me. To further simplify and bring piece of mind meant cutting away all the cable protection and bringing the cables up into the light where they could be seen.
 I'd researched this before doing a thing to look up what to cover the loom in to leave it loose enough and still afford a little protection - the answer was loom tape - didn't know the stuff existed so bought three rolls, only used half of one. So now all the cabling has a woolly look but to access all i need do is undo - simple.
 Turns out i can use anything on the alternator (apart from the 'W' and '+' marked stud as its an 'earth return alternator' which means it has no designated negative so just use any part thats bare metal, engine block etc so have ordered a replacement bolt that the bottom of the alternator connects to via a load of spacers so they'll be enough space left at the end to bolt on the boats neg. connection.
 Dragged the engine out of the dark corner in my garage today where its lane for the last six and a half years, out into the light it came covered in a thick layer of dust curiously chipped of a lot of paint and corroding in places and this is in a dry garage christ knows what it will resemble after a season in the boat, probably not alot different to the previous incumbent,
 Then mentally got ready for the drag around the garden to the shop although not as bad as a 600kg keel it still made my back scream a little, got there and after some nifty work with timber offcuts and alot of swearing got it into the shed it was only on dragging it through thedoor i noticed how pissed the belt line was on the front of the engine.
 I remember the engineer who came out and had a look tell me it needed doing but paid scant attention to it, on further inspection i realised it was a biggy, so photographed the wiring to the alternator and took pictures of the general arrangement of the front end before breaking it down. Thought i should check the alt. to see if the casting was bent and similarly with the front of the engine block - long shot i know but both were straight as a die, i concluded my engine had been assembled quite poorly, i'd phone Headley at EnginesPlus if i thought he'd pick the phone up, no matter.
 Some three hours of barking knuckles and a bit more salty language i got the belt pulling in the right direction with the alternator this time firmly attached to the front of the engine. Seeing as i found the bottom bolt with the spacers was finger tight with the spacers free to move about on the bolt so doing nothing to keep the alt straight and under tension.
 Still on more positive note had a good result after much surfing i found a company called Hyphose who supplied me with all the hoses for the engine compartment at a fraction of the cost of the usual online swindleries to the tune of a 45% saving. Also picked up a flexible coupling and a bilge pump too so as the engines fitted all these parts can go in whilst access is good.
 Plus it draws on what i used to do for a living many moons ago although i don't do much 'fine' work as at present here in the UK the economy is still in such a parlous state that no one wants a good job they all still want a cheap one so my paid work seems limited to what i affectionately call 'turd polishing'.
 Got most of it finished off apart from the seat back that'll form the infill for the double but i can't make that as i don't know how long it'll be because i've yet to make the companionway steps and frame it'll sit against so for now its back into your favourite space and mine the coffin........ i mean the engine compartment. (Bloody feels like one though).
 Totally forgot to post my day out i had a couple of weeks ago helping a couple of mates pull their Centaurs from the river in Chirstchurch. Hence the piccy above of Tony's boat and Zafira pulling John's custom-made trailer, be it not very far - just to the other side of the car park.
 Getting rather giddy with excitement as i started veneering the top of the sofa frame with a load of scraps of the 1.5mm ply i used to make the internals look pretty and have to say it got my mojo hooked up and running again, dunno how long it'll last but i'll keep going till it runs out.
 It was only when i stepped back, almost off the stern i realised today just how much i've cut out of the arse end of my Centaur, the latest in 'weight-saving' came about from cutting a 10" diameter hole in the cockpit floor to access the fuel tanks systems.
 Must of had the bloody thing in and out a dozen times including undoing and doing up the screws that hold the tanks feet on too! Still all worthwhile so now i know that works i'm hoping to do one more coat in the bilges tomorrow then bolt in the tank permanently as well as the rails.
 Got to frame up the settee today after running out the hardwood to the desired dimensions, decided to frame it all up as per Richard Gunn's Mk1 Griffon, i've made a couple of cock-up's but overall nothing that cant be sorted and does look like a reasonable copy of said Griffon.
  Was hoping to mount the steel angles on Tuesday but for the paint hence i moved onto framing up the settee instead. Tomorrow i'll tab in the settee as i've left this until last as i'd rather work around the joinery than vice-versa.
 bulkheads to the hull, for all my whinging it does the job i guess. Then onto the engine compartment get the rails in then that 'll allow me to close in the 'utility room' where the additional tanks live; get the bulkhead (i made weeks ago) bonded in then we've officially closed the back of the boat off from the saloon that'll allow me to then frame up the galley too.
 This week started off fairly leisurely as i attended (imo) the Southampton Yawnfest otherwise known as the Southampton Boat Show which highlighted in almost every way why sailing and boating is on an unstoppable decline here in the UK.
 Moving on, this week can best be described as 'challenging' having got very well acquainted with my former i'd built the previous Saturday then rebuilt twice this last week..........bored!

 I never thought something as simple as a settee could make my brain ache this much. Since Thursday i spent most of Friday and today measuring my ones indoors as well as looking at websites regarding ergonomics and the approximate dimensions required by the average human being and finally i distilled all this information as to what i think is most practical for my Centaur.
 I started Saturday sheathing the first of many foam components; the bulkhead that will book-end the settee from the port corner that will be comm's, electrics and cable central. I think what i'm getting nervous about is finally after some five years i now have to decide exactly where everything's going.
 Hence the two days on the settee arrangement, plus i've been conversing with a mate of mine who i sailed with who had (and now sold) a MK2 Griffon and got the skinny on how that double berth arrangement worked as well as trawling the internet for any other ideas although i do like the MK1 Griffon idea of a pull out like a big drawer.
 I like the MK2 idea of folding out 180 degrees a panel that forms the double but the only thing i dont like is seeing the barrel of the hinge along the front edge. I'll have to make a decision as i want to start building it Monday along with the corner part of the sofa of which i made the former for today.
 Thought i'd post yesterdays success that is the new chain plate mounts, after going through Eric's impeccably detailed drawings i decided to add a sheet of grp each side as the lay-up inside the hull is slightly more lumpy than the moon to create a flat even surface.
 The first one (starboard) didn't go according to plan as there were too many pin holes in it so after what seemed like an eternity i tore it from the hull got another sheet of the material and tried again; it finally pulled down but only to 29Hg and not after loads of massaging of the tape all around the edges.
 So i now have two rather large areas of reinforcement on either side of the hull to take the cap and inner shrouds down to. Knowing this when i'm pushing hard to windward fills me with confidence about stepping a larger backstay-less rig.
